Forced Cold Restart on HPLC

Sometimes you might get strange errors on the HPLC modules.  This trick is called the forced cold restart, or factory reset.  Basically clears errors and resets set points on the module to the factory settings.  This is useful for strange oddball errors that may appear on the HPLC.  This works on many of the 1100 up to the 1260 modules.  On the back of the module, you will see a row of white dip switches, usually with the label CONFIG.  These switches are 1-8 starting from the left.

Take note of the exact arrangement of the switches currently, so that you can revert them back to the way they were when you are finished.  Turn off the module.  Make switches 1,2, and 8 up, and every other switch down.  Turn on the module for a few seconds, then turn it off.  Return switches to the original configuration.  Forced cold restart complete.

Clear GC local memory (6890,7890)

Sometimes the method stored on the actual GC, not the software, can become corrupt.  It may cause you to see strange, nonsensical errors.  In this case you may need to clear the local memory, and reset the GC to the default settings, while preserving the ip address and the configured inlets and detectors (things configured as AUX may need to be reconfigured).

To reset the memory, turn off the GC.  Hold the Clear button, turn on the GC while still holding the Clear button.  Continue to hold the clear button until the GC powers on completely.  Memory reset complete.

HPLC No Flow!

It happens sometimes that the HPLC pump is on and pumping,  but there is no flow coming out.  If you have an air bubble somewhere in the tubing, you will notice that its either not moving, or just moving back and forth.  The very first thing you can try, is just opening the purge valve, and pumping at 5ml/min to get an air bubbles out.

Also, you want to check your solvent bottles, make sure there is solvent there.  If you are using solvent filters on the ends of your lines, make sure they are not clogged.

After checking that, you can try loosening the line going into the active inlet valve:

2

Sometimes just relieving the pressure here can solve the issue.  If not, you will want to remove the outlet ball valve.  There is capillary on top of the valve that must be loosened and removed first.  Then you can remove the valve.

1

Sometimes the pump can get air locked and just needs to be “burped”.  Removing this valve and running the pump will allow it to release any air that may be trapped.  You will see a small well where the valve was sitting.  You want to make sure that the well fills up with solvent with the pump on.  If not, you problem may actually be the Active inlet valve.  That valve has a cartridge that can get clogged, or it could be the actual valve itself.  Replace the cartridge first, then replace the valve if that doesn’t help.

This procedure will work for Agilent 1100\1120\1200\1220\1260 Binary\Quat\Iso pumps. For Quat pumps you also want to make sure that the MCGV isn’t blocking solvent from reaching the active inlet valve.  You can remove the line that goes in the middle of that MCGV and just place it inside a beaker of solvent.

3

Turn on the pump and see if there is any change.

These procedures assume that the pump is actually moving.  You can usually tell just by hearing the pump mechanism moving when you turn the pump on.

Extracting a Signal from Spectral Data

If you collected spectral data in your run and would like to extract a wavelength from that data, you can follow these steps below.

First, load your data file.  Next, select Spectra then Isoabsorbance plot.

1

On the upper left box on the screen you want to change Cursor to Signal.  Then select the wavelength you would like to extract.  In this example I chose wavelength 200.  You can also specify a reference signal and bandwidth as well if needed.

2

After selecting the desired signal, push copy at the bottom then hit ok.  You may get a pop-up message about temporary data, you can hit ok to that as well.  You will now see your chromatogram for the signal you extracted.

4

How to Build a Calibration Table in Chemstation (with screenshots)

This will be a quick tutorial on how to build a calibration table in Chemstation, with screenshots.  The first thing that you want to do is run your standards.  Most of the time you want to have 3 levels; low, medium, and high.  You want your compound of interest to have a concentration close to the mid-range level.  For example, if my samples will typically have a concentration of 50 ng/ul, then my standards could be 25, 50, and 75 ng/ul.  Some people might have five or more levels, others might just have one level.

Next step is integration, you want to be sure that your peaks of interest are all integrated, and you can filter for unwanted peaks (possible blog post about that process).

After running your standards, and integrating, the next step would be to select calibration, and new calibration table.

2015-09-18_20-28-43

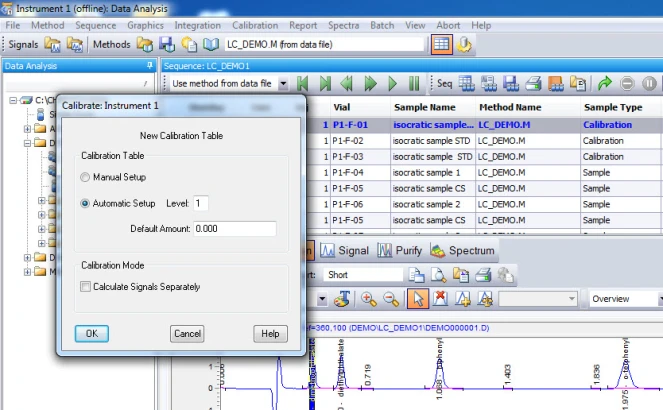
I usually leave the settings with the default and hit ok.  Now, every single peak that was integrated earlier will show up on your calibration table.  Unwanted peaks can be removed by keeping zero as the amount.

2

You can tell the integrated peaks by the pink line beneath the peak and the retention time label above it.

3

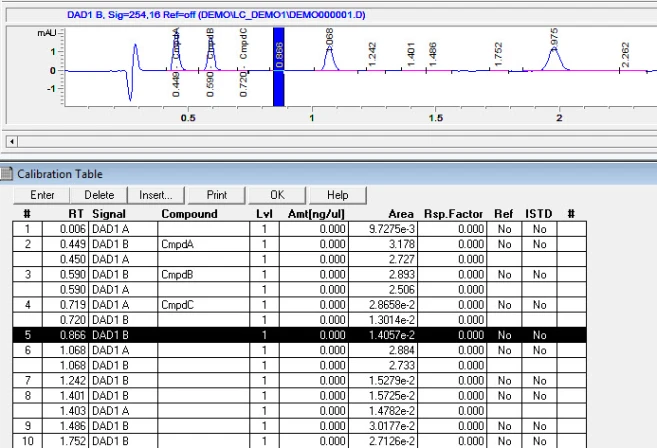
At this point, when you click on each line, you can see which peak you are on and give it a name and an amount.  Again, the units for amount are totally customize able.  I had a post about this earlier.

4

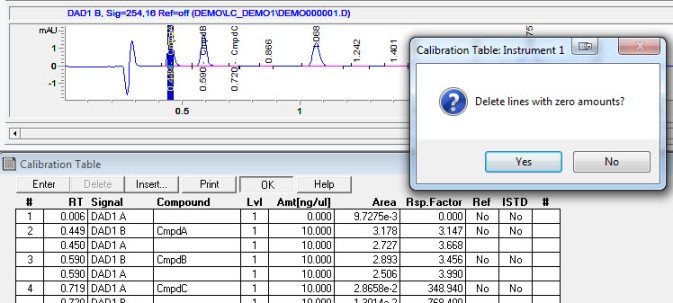
After adding the amount, hit ok, and chemstation will delete line with zero amounts.

5

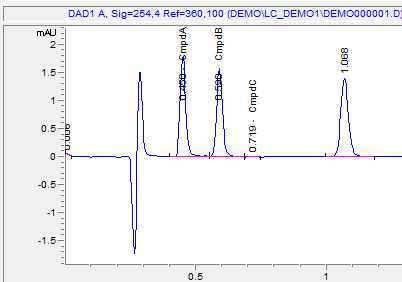
The peaks now have the name that you specified above them.  Load your level two calibration run, go to calibration and select Add Level.

6

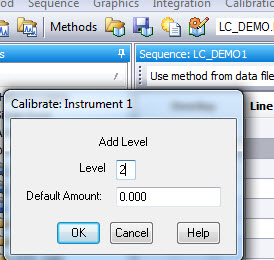
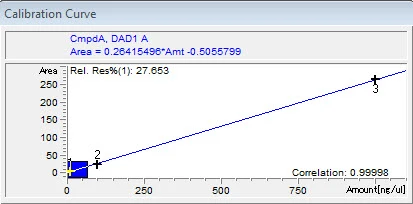
Do the same thing this time, you’ll only have to add the amount for each peak with each subsequent level.  After adding all of your levels, you can look to the right of the calibration table and see the calibration curve, equation, and r value of each compound.

7

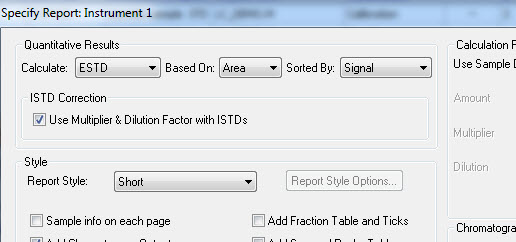
The calibration table is now complete.  Be sure to select the proper quantitative settings by going to report, then specify report.  For this type of calibration table you want to select ESTD based on area.

8

GC Inlet Pressure Shutdown

What is the number one cause of an inlet leak?  The septum no longer sealing the inlet.  This is the very first thing I would change if my inlet could no longer maintain pressure.  This holds true for 5890, 6890, and 7890 HP/Agilent GCs.  Even if you just changed it, I would recommend changing it again just to be sure.  Think about it, this septum is actually being pierced by the needle over and over again, its only a matter of time before it will start leaking.

5183_4757

Another easy fix would be to tighten the column nut in the inlet.  This is located inside the oven on the left side.  As the GC heats up and cools down, its very possible for the nut to become loose.  When you tighten this, you want it finger tight (make sure its not hot!) and then about a quarter turn or a little more with a wrench should be good.

medium

Lastly you want to replace the liner and the o-ring if you are still having pressure issues.  Sometimes the glass liner can crack, or the if the o-ring is old it won’t make a good seal anymore.  Again, make sure the inlet is cool before touching anything.

Liners

These should take care of any minor leaks you may have, i.e. can build some pressure just can’t reach setpoint.

Now what if you can’t build any pressure at all?  In this case the first thing I would do is check that the supply gas is making it to the GC.  To do this slowly unscrew the gas line connection to the back of the GC (obviously you want to make sure you select the carrier gas line) and as soon as you start to loosen it you should hear ‘hissing’.  If not, then your problem is not with the GC, but with the supply gas.  If the supply  gas is fine, and you have 0 pressure reading on the inlet, I would suspect a more serious problem.  This could be the EPC module that is bad, or the inlet weldment could have a crack, same with the top insert assembly.  Further diagnosis can be achieved with an electronic leak detector, or a soapy solution such as snoop.

Another way to narrow this down:  You can open the top insert as if you were removing the liner, and just cover the bottom of that cap (where the two stainless steel tubes go) with a thumb or septum.  Turn the pressure on for the inlet and see if its able to build pressure.  If yes, the leak is downstream from there, inlet weldment or column nut.  If not, then the leak is before that, the stainless steel tubing or the EPC module.

High Pressure in my HPLC!

Ok so no one wants to see the pressure on their HPLC higher than what it should be.  In my experience the number one cause of high pressure is a clog in the autosampler.  Followed by a clog in the purge valve frit, as the second highest cause of HPLC over pressure.  Luckily, there’s an easy way to diagnose whether or not there’s a clog in the autosampler.  This technique works on Agilent model HPLCs and Chemstation, not sure about other brands.

Turn the pump on, once you see the high pressure, right-click on the diagram of the autosampler.  Select the switch valve to bypass option (see below).  See if pressure drops immediately, if so change the needle and needle seat (or backflush).

bypass

Note: Older versions of chemstation will only have that option available in the diagnosis tab.  I may make a tutorial on the process in the future.

What if the pressure is still high?  Try removing the column from the flow path.  If that doesn’t help, try removing the autosampler from the flow path.  If that doesn’t work, try opening the purge valve.  If opening the purge valve does not decrease the pressure, try replacing the purge valve frit.

Pro Tip:  When installing a brand new column, make note of the pressure of the system.  This is what your pressure baseline is, and will be a good reference in the future when you are not sure if your pressure is where it should be.

Chemstation Calibration Units

Pro Tip: Chemstation does not look at the units when calculating amounts.

Example:

amt

As you can see the amounts is in ng/ul.  If I go to calibration–> calibration settings, I can choose any unit (or non unit for that matter) I like.

amt2

In this example I chose Aliens as my unit of choice.

amt3

As you can see, Chemstation willfully changes the units to that value.

Why is this important?  Many people think that Chemstation will convert units for you.  You can add a dilution or multiplication factor, but that will be used in the calculation of the amount regardless  of what units you choose.  Best practice would be to build your calibration table based on the units which you would like your results to be, so that by the time you print the report, you won’t need to convert any units.

Blog at WordPress.com.

Up ↑